Additionally, you will also learn one bonus method with which you can capture screenshots on Android with the home button.
Screenshot Without Buttons
Android
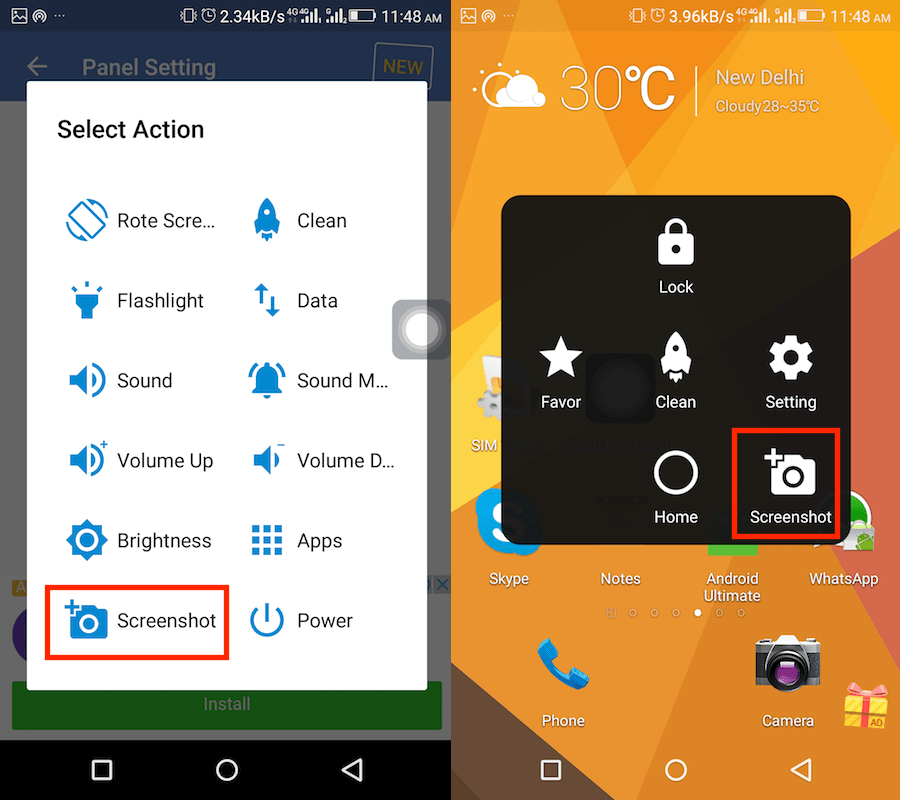
- Visit Play Store and search for Assistive Touch for Android app or use the following link. Install the app and open it.
1 Screenshot Without Buttons1.1 Android1.2 How To Take A Screenshot With The Home Button1.3 iPhone2 Take Screenshot Without Using Print Screen Button On Windows2.1 Method 1: Take Custom Screenshot Or Full Screenshot Using Snipping Tool2.2 Method 2: Take Screenshot Using On-screen Keyboard
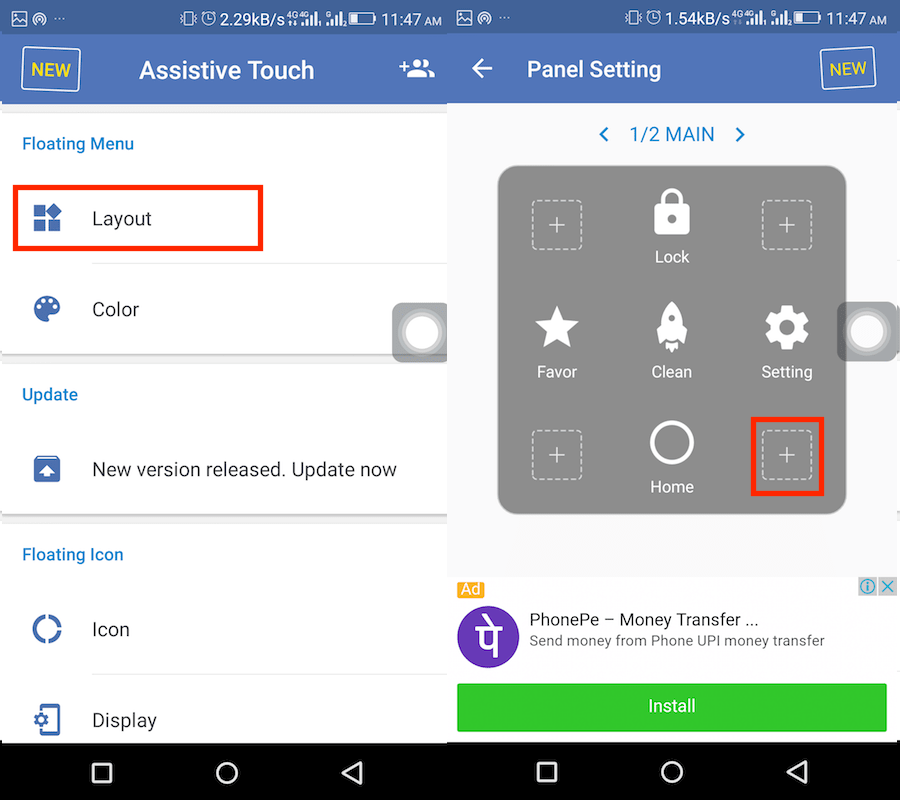
Tap on Layout under Floating Menu section.
Now, tap on the + icon and on the next screen come down and select Screenshot.
Exit the app and you will see the assistive touch icon. Go to the desired screen you want to capture and tap on the assistive touch icon. Select Screenshot to capture the screen.
You can always get rid of the Assistive touch whenever desired by simply uninstalling the app.
How To Take A Screenshot With The Home Button
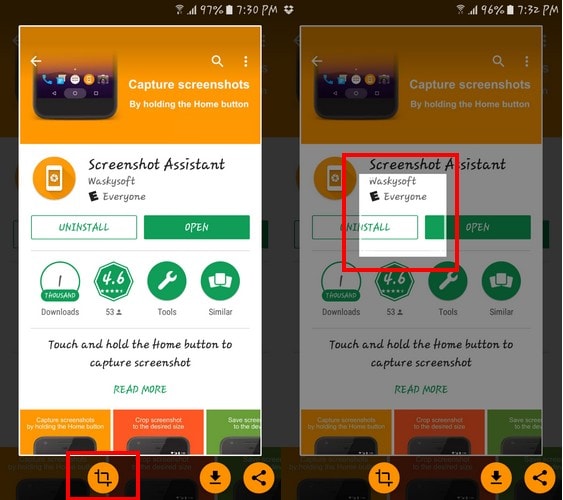
The only app you’re going to need to use the Home button for screenshots is called Screenshot Assistant by Waskysoft available for free on the Play Store. When you first install the app, it’s going to take you through a brief introduction of the app, and you will also need to set up the assistant preferences.
When you set this up, you will not be able to use Google Assistant. It’s a sacrifice you’re going to have to make if you want to use this app. Once you’ve chosen the app, hit the back button and the app will let you know that everything is set up. Tap on the Done option on the bottom right. Once you tap on done, it’s all set up. Find whatever it is you want to take a screenshot of and only press the home button. Make sure that you keep the home button pressed but only for a few seconds. After taking the screenshot, you will see some options at the bottom of your display. The first icon allows you to crop your screenshot. When you tap on this option, you will see a white square. If it’s the right size, you can simply move it to where you want to take the screenshot. If it needs some adjusting just tap a side and adjust it to the size, you need.
To the left of the share button, is the option to save the screenshot to your Android device once you have what you need. With the share button, you can use to send the screenshot to any app you have on your phone. At least during my testing, the app didn’t have any compatibility issues with another screenshot app I have on my phone. I was able to use both of them without any issues. The app is good, but it would be even better if it allowed you to designate any button as the trigger. For example, instead of it being the home button, you could go into settings and make the power button the trigger. Who knows. Maybe in the future, the developer will make some much-needed improvements. Anyways you will be able to take a screenshot without Power button on Android using this app which you may require.
iPhone
As iOS officially has assistive touch you don’t need any third party app. Follow the steps below to turn on assistive touch on iPhone or iPad.
Go to Settings and select General. Next tap on Accessibility followed by AssistiveTouch. Finally, toggle the AssistiveTouch switch to ON.
This will enable assistive touch on your iOS device. To take a screenshot using Assistive touch tap on its icon and select Device. Now, tap on More and select Screenshot.
That’s all there is to it. Now coming to Windows PC, if you are looking for a print screen button alternative or if your print screen button is not working, then you always have a couple of options to take the screenshot on your Windows laptop or a PC. Here’s how.
Take Screenshot Without Using Print Screen Button On Windows
Using one of the methods in this section, you can take the custom screenshot, which is not the case with print screen button. The “prt sc” button takes the screenshot of the whole screen. You do not have to install any software or apps on your Windows system to achieve this task. In one method we will use snipping tool while on-screen keyboard in the second method.
Method 1: Take Custom Screenshot Or Full Screenshot Using Snipping Tool
Click on the Windows icon on the bottom taskbar.
Type in “Snipping tool” and press enter.
Snipping tool will open, click on New as shown in the picture.
Next, click on the screen and drag to select the part of the screen you want to take the screen and then release the mouse click. This will open the selected area screenshot in snipping tool.
Now, click on File and then click on Save As option to save the image to the desired location.
This tool can help you save the partial screenshot and full screenshot as well.
Method 2: Take Screenshot Using On-screen Keyboard
If you want to take the screenshot without Snipping tool then you can use the on-screen keyboard. The On-Screen keyboard is nothing but a virtual keyboard. It will have all the keys available on your actual keyboard. Follow the steps to take the screenshot.
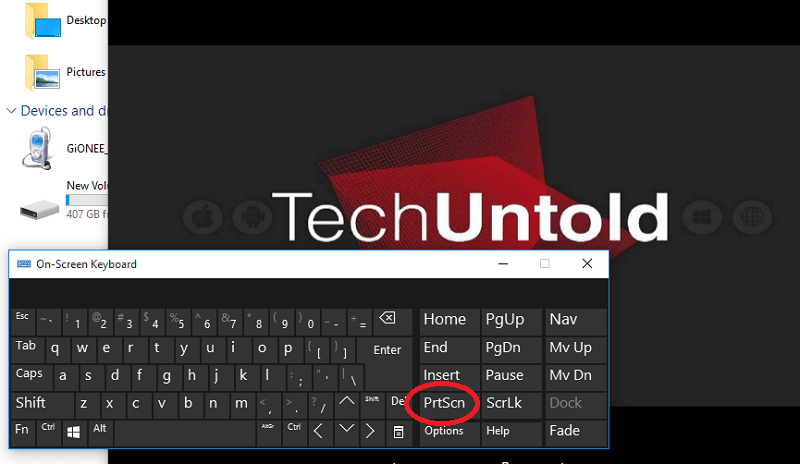
Click on the Windows icon and type in “On-Screen Keyboard” and press enter.
Once the virtual keyboard opens, you can need to look for the “Prt Scn” key and click on it. This will take the screenshot. You can open paint and paste it.
The drawback with this feature is that it captures on-screen keyboard in the screenshot. So you have to adjust accordingly or use snipping tool. So you have 2 ways to take a screenshot without print screen button on Windows laptop or a PC. I prefer Snipping tool as it has a feature to take custom screenshots. We hope that you were able to take the screenshot without buttons on Android, iPhone and Windows PC. If you found the tutorial helpful then don’t forget to share it on social media. Save my name, email, and website in this browser for the next time I comment. Notify me of follow-up comments via e-mail.
Δ


![]()


