If you have already created an account with Microsoft, your user account will display your full name, and unfortunately, Windows 10 doesn’t offer an option to change your full name or instead use a username. Thankfully we have compiled a list of methods through which you can learn How to Change User Account Name in Windows 10, so without wasting any time let’s see how to do that with the help of the below-listed tutorial. Note: Following the below-method will not change the name of its user profile folder under C:\Users.
6 Ways to Change User Account Name in Windows 10
Make sure to create a restore point just in case something goes wrong.
6 Ways to Change User Account Name in Windows 10 Method 1: Change Microsoft Account Name in Windows 10 Method 2: Change User Account Name in Windows 10 using Control Panel Method 3: Change User Account Name in Windows 10 using Local Users and Groups Method 4: Change User Account Name in Windows 10 using netplwiz Method 5: Change User Account Name in Windows 10 using Command Prompt Method 6: Change User Account Name in Windows 10 using Group Policy Editor
Method 1: Change Microsoft Account Name in Windows 10
Note: If you follow this method, then you would also rename the name of your outlook.com account and other Microsoft related services.
First, open your web browser the visit “Your Info” page using this link.
Under your Account User Name, click on “Edit name“.
Type First name and Last name according to your preference then click on Save.
Note: This name will be displayed on the sign-in screen, so make sure you don’t actually use your full name again. 4. Reboot your PC to save changes.
Method 2: Change User Account Name in Windows 10 using Control Panel
Search for the control panel from the Start Menu search bar and click on it to open the Control Panel.
Under Control Panel, click on User Accounts then click on Manage another account.
Select the Local Account for which you want to change the username.
On the next screen, click on “Change the account name“.
Type in a new account name according to your preference then click on Change name.
6.Reboot your PC to save changes. This is How to Change User Account Name in Windows 10 using Control Panel if you still have a problem then continue with the next method.
Method 3: Change User Account Name in Windows 10 using Local Users and Groups
Press Windows Key + R then type lusrmgr.msc and hit Enter.
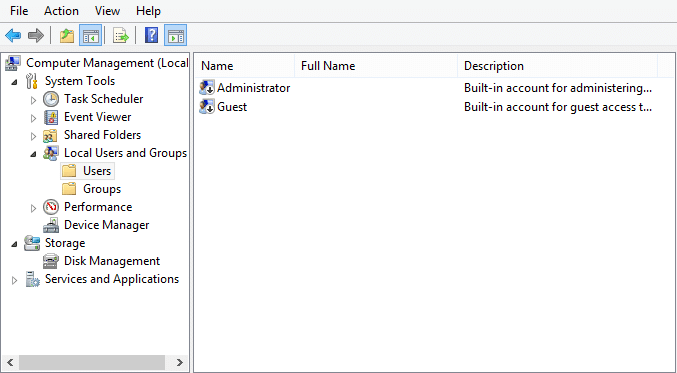
Expand Local User and Groups (Local) then select Users.
Make sure you have selected Users, then in the right window pane double-click on the Local Account for which you want to change the username.
In the General tab, type the Full name of the user account according to your choice.
Click Apply, followed by OK.
The name of the local account will now be changed.
Method 4: Change User Account Name in Windows 10 using netplwiz
Press Windows Key + R then type netplwiz and hit Enter to open User Accounts.
Make sure to checkmark “Users must enter a username and password to use this computer” box.
Now select the local account for which you want to change the username and click Properties.
In the General tab, type the Full name of the user account according to your preferences.
Click Apply, followed by OK.
Reboot your PC to save changes and this How to Change User Account Name in Windows 10 using netplwiz.
Method 5: Change User Account Name in Windows 10 using Command Prompt
Open Command Prompt. The user can perform this step by searching for ‘cmd’ and then press Enter.
Type the following command into cmd and hit Enter: wmic useraccount get fullname, name
Note down the current Name of the local account for which you wish to change the username.
Type the command below into the command prompt and hit Enter: wmic useraccount where name=”Current_Name” rename “New_Name”
Note: Replace Current_Name with the actual account username which you noted in step 3. Replace New_Name with the actual new name of the local account according to your preferences. 5. Close cmd and reboot your PC to save changes. This is how you Change User Account Name in Windows 10 using Command Prompt.
Method 6: Change User Account Name in Windows 10 using Group Policy Editor
Note: Windows 10 Home Users won’t follow this method, as this method is only available to Windows 10 Pro, Education and Enterprise Edition.
Press Windows Key + R then type gpedit.msc and hit Enter.
Navigate to the following path: Computer Configuration > Windows Settings > Security Settings > Local Policies > Security Options
Select Security Options then in the right window pane double-click on “Accounts: Rename administrator account” or “Accounts: Rename guest account“.
Under Local Security Settings tab type in the new name you want to set, click OK.
Reboot your PC to save changes. Recommended:
Enable or Disable User First Sign-in Animation in Windows 10 How to View User Account Details in Windows 10 Limit the Number of Failed Login Attempts in Windows 10 Enable or Disable User Accounts in Windows 10
That’s it you have successfully learned How to Change User Account Name in Windows 10 but if you still have any queries regarding this tutorial then feel free to ask them in the comment’s section.


